Welcome to Webtalk, the world's first All-In-One Networking and Commerce Application!
Webtalk is currently in an invite-only beta, and this is great news for you! As part of our official launch strategy, we are offering huge financial incentives for our Early Adopters, as well as promotional offers on all products and services!
Make sure to sign up, enroll in the affiliate program, and start earning cash rewards for all your social activity, simply for making the switch to WEBTALK!
1. Visit get.webtalk.co/7026813 and click 'Sign Up'
2. Fill out your Name, Email, and Password to continue
3. For quicker onboarding, you can sign up with Facebook or LinkedIn (US Only for now)
4. When asked "Who Invited You?", type the Name or Webtalk ID (referral code) eg
Danial (7026813) of the person that invited you to the platform.

** Using the correct Webtalk ID is important! You want to make sure that invited you gets credit for bringing you to the platform. Also, make sure when you start inviting your friends, that they know to use your Webtalk ID, or simply to click your links so you get credit too!
1. Birthday information
This helps us verify your age and will help with experience verification.

2. Gender
This information helps make sure we give you the right experience for your gender.

3. Location
This information helps us optimize your search, and any location based services.

Press continue to view your new Webtalk account!
Completing Profile to 100%
Completing your Webtalk Profile is an essential step in unlocking the full
functionality that Webtalk offers!
Webtalk was designed to set you up for more success with a proprietary SocialCRM.
This unique feature helps you organize and manage your contacts and relationships online,
like you do in real life!
Completing your profile also qualifies you to earn real cash rewards for your activity
on Webtalk!

1. Add Your Experience (Set the privacy settings for this section of your profile by
clicking the orange earth icon):
- Add a Company Name
- Add a Job Title
- Add a Location
- Add a Time Period of Employment
- Check if you are still employed with company
- Add a Job Description

2. Add Your Education (Set the privacy settings for this section of your profile by
clicking the orange earth icon):
- Add a Degree
- Add a Field of Study
- Add a Name of the School
- Add a Location
- Add the Time Period

3. Upload Your Photo:
- Drag and Drop an image into the field provided -OR- click
- Browse Your Files to select an image

- Easily Edit your pictures before completing upload

- Click Edit to make additional changes, click New to upload a different picture
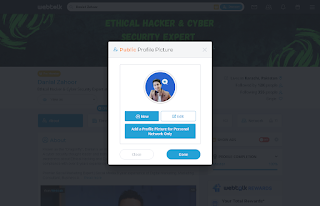
- Click Done to complete upload.
4. Add a Short Bio:

5. Profile Completion!

Email Confirmation and Complete
Sign-up
To finish creating your Webtalk account, please validate the email address
1. Click the link sent to you via email. Can't find the confirmation email?
2. Complete sign-up

NOTE: Verifying your contact information will help us know we’re sending your personal account
information to the right place. Please verify your email as soon as possible.